
written by: kelsey pence
Content
This exercise is inspired by a conversation with Gus Fahey from Valley in Motion, and by the Trust for Public Land’s (TPL) Transforming Schoolyards work. The Transforming Schoolyards projects with TPL are much longer in scope but are centered on youth- and community-led participatory design processes. The activity outlined below can be utilized as a standalone activity to serve as an entry point to participatory design processes that help students re-envision the public spaces they want to see, and therefore feel empowered to envision and create the future they want. If your context allows, you can explore more about what this longer term process might look like at the links included in the “Resources” tab.
This resource can be used in formal education settings as well as in informal community settings.
Context
Grade Levels: 4-8
Total Time: 90 minutes
Materials Needed:
- tracing paper (optional, see note on preparing design layout)
- poster boards or craft paper that include spatial outlines of selected location (for students to create designs on)
- markers
- coloring pencils
- construction paper
- scissors
- glue
- optional additional materials: craft pom pom balls or other items that could add dimension and/or simulate 3-d objects like bushes, trees, etc.
A note on preparing for the activity:
Selecting the Space: To enhance the connection to community, choose a specific community space that is meaningful to the students prior to this activity. The community space can be collaboratively chosen with the participating students.
- Some examples you may select from: using the TPL’s Community Schoolyards project as an example, select your school’s playground as a space to redesign, or choose a park or playground in the school’s neighborhood.
Preparing the design layout for students: In order to give students a physical layout for which they can craft their design ideas, educators/facilitators can:
- use google earth to screen shot the layout of the community space, print out that screen shot and then use the tracing paper to draw a rough outline of the space. This outline can be used as the frame/structural outlines within which students can place their own designs. Educators will need to make enough copies so that each student has at least one poster board prepped with the spatial outlines drawn on.
- there are many ways educators can create the outlines of their selected space. another option similarly can start with a screenshot of the google maps outlines. Instead of using tracing paper, educators can use Paint, Adobe or other digital platforms to draw the spatial outlines that can then be transferred and copied onto each student’s poster board.
Optional Pre-Work Activities to do with students: To help students prepare to think creatively and get in the mindset to shift perspectives and engage in visioning work, it is helpful to offer experiential learning as pre-work or additional activities that occur prior to the one outlined on this blog. This experiential activity(ies) can help students experience the community space in a thoughtful way, and can support their design process by prompting them to note attributes of the space that they would either want to keep, remove, or alter in some way once they start designing. These prep activities may look like:
- a scavenger hunt in the space they will later redesign. The scavenger hunt may prompt students to find:
- flora/fauna in the space
- built structures
- other attributes of the space (is it hot, what emotions do students feel when they walk through the space? is it crowded? empty? is it accessible for everyone to move through in the same way?)
- a walk-through of the space they will later redesign. Facilitators can encourage students to identify:
- one thing they like about the space,
- one thing they wish was different,
- any other elements they see that they like,
- why they noted these items (is it the texture, the color, the shape, the function?)
Learning Outcomes:
- Students will have created their own public space design, supporting a sense of individual agency within the context of their community and their future.
- Students feel empowered with a sense of possibility, hope, and confidence.
- Students feel a deeper connection to public spaces in their community, with community members, and to the environment.
Implementation
Introduction – 20 minutes
- Start with a quick icebreaker by asking students, “what is your favorite way to play?,” or “what is your favorite thing to do at recess?” Allow 5 minutes for students to popcorn their answers.
- Then, introduce the activity: “Today, we’re going to get our creative juices flowing. Thinking about your favorite way to play, we’re now going to think about where we like to play. We’ll have a chance to design a new and improved version of our [insert name of community space, e.g. school’s playground]! You will each get an outline of the space’s shape, and will get to add in your desired design elements. You can add trees, flowers, other plants. You can add the type of playground activities you’d like to see – maybe a swingset, a spaceship-shaped climbing area, etc.”
- Then, prompt a 10-15 minute group discussion and brainstorm to help the students get their design ideas flowing:
- “What is one thing that you can think of right now that you might add to your design? Maybe you’re thinking about what you like to see when you go outside.”
- Students can then popcorn their ideas, while the facilitator/educator writes those on a whiteboard, chalkboard, or poster paper that will be visible for all to reference.
- To help with this, the facilitator/educator can also show some examples (either on a projection screen or as print-outs) of redesigned playgrounds. Some examples copied below, from the Trust for Public Lands Website:
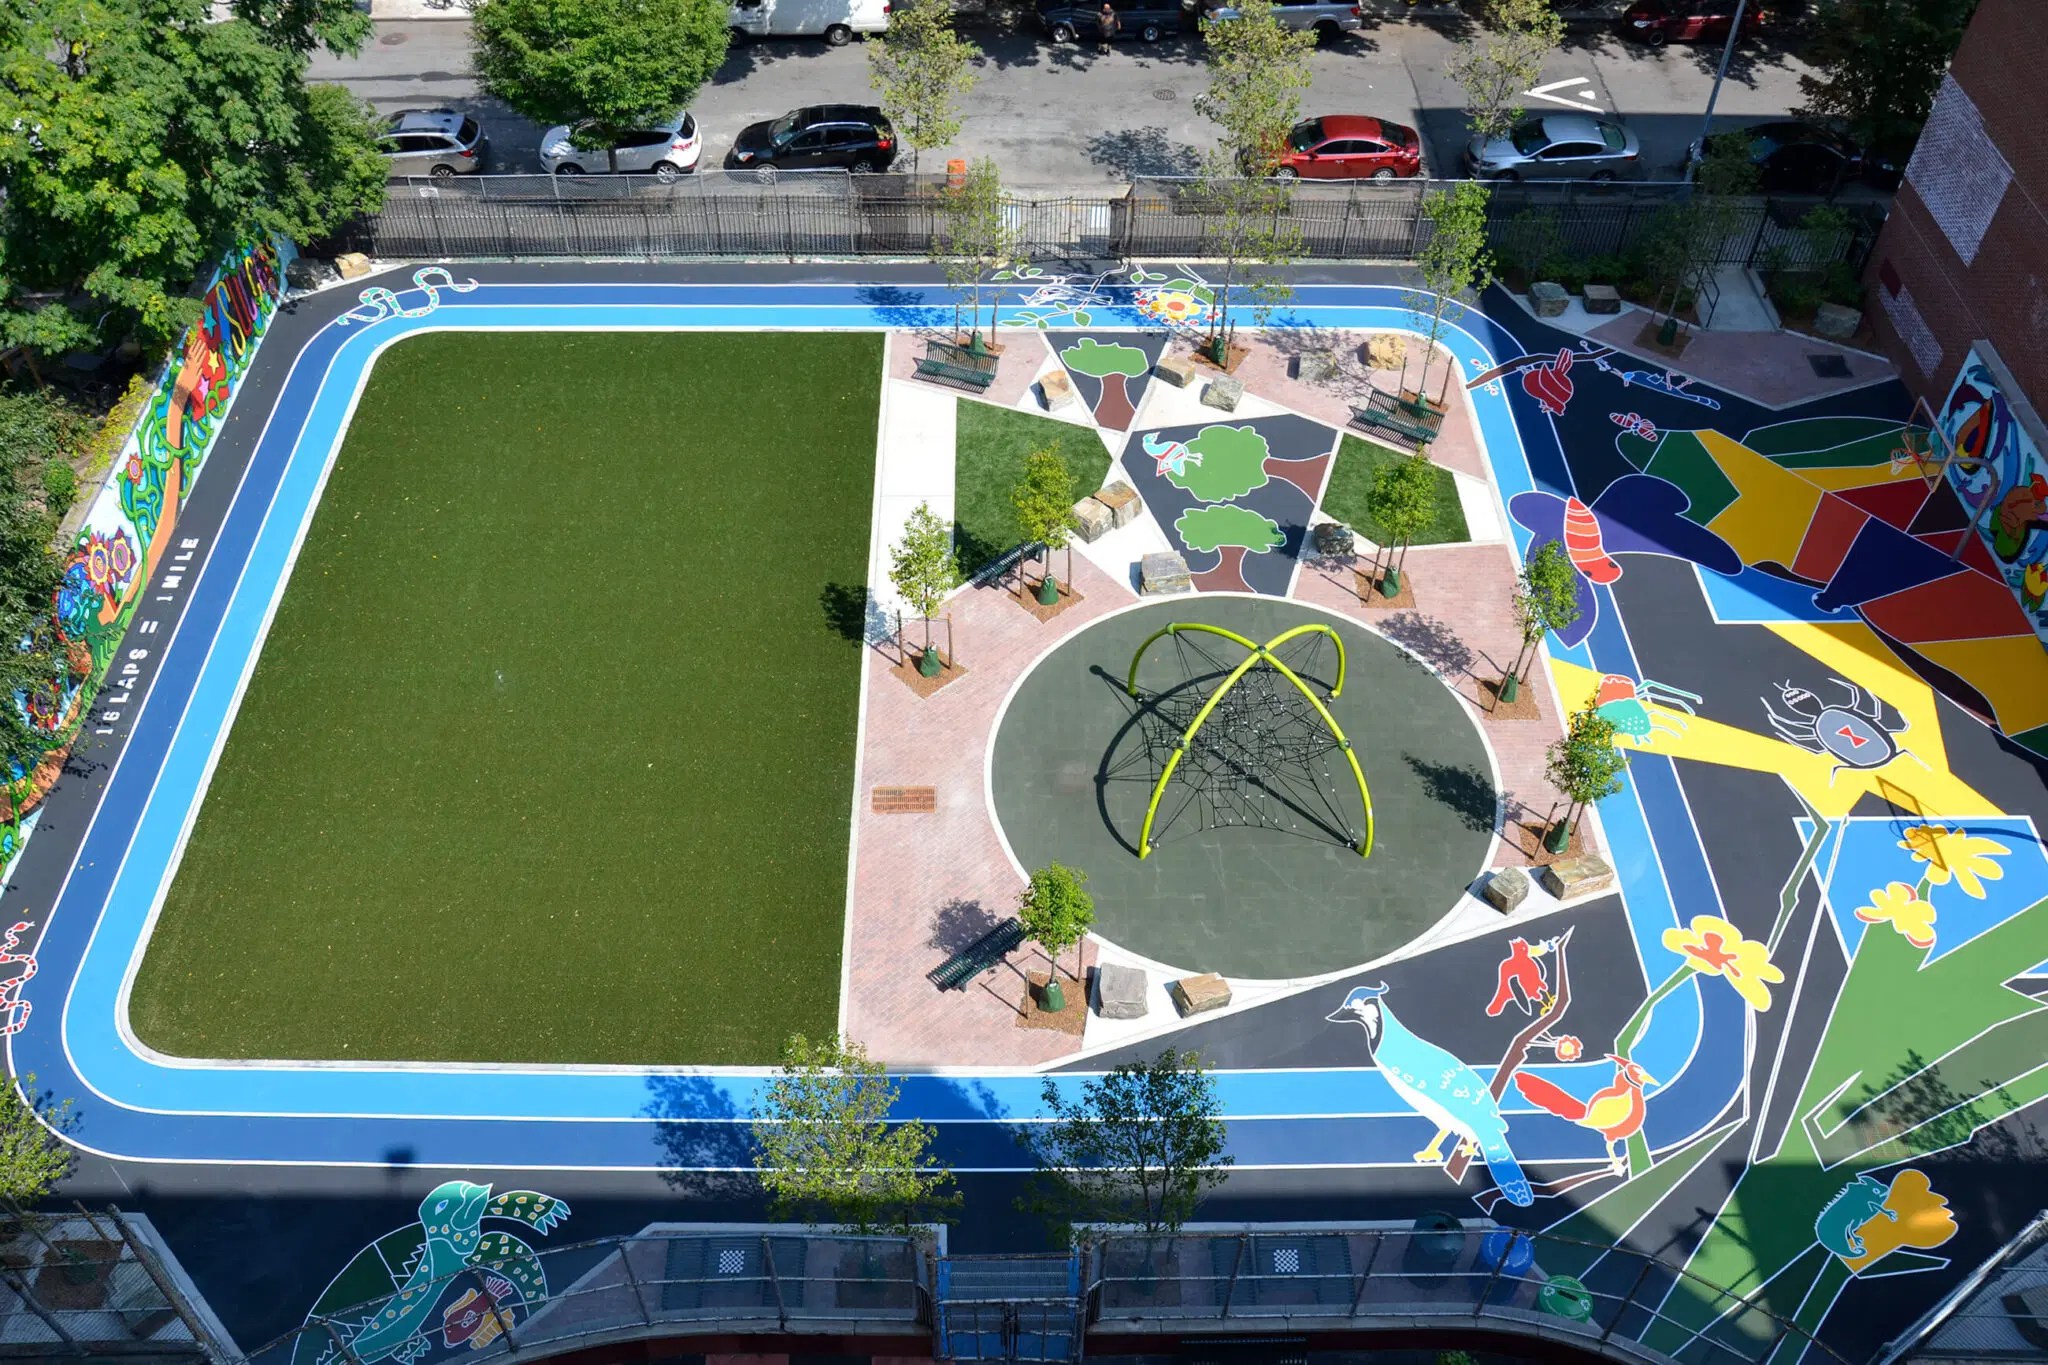
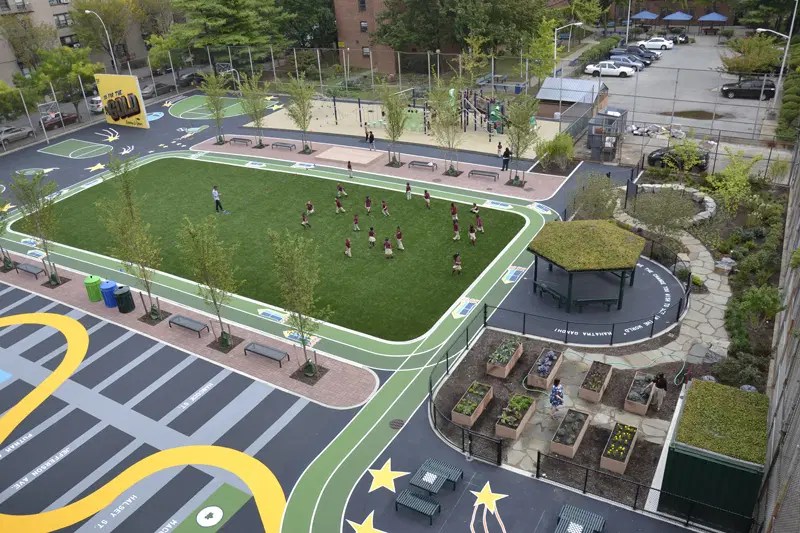
left image; top right image; bottom right image
- Facilitators can also pull up an image of the specific space that students will redesign, prompting questions like:
- what do you notice about this space?
- what do you like most about it? what do you like least about it?
- what do you think is missing, or what do you wish you had here?
- is this space accessible and usable for everyone in this classroom? for everyone in the community?
Designing – 40 minutes
- This is now time to let students start crafting their designs. Hand out a copy of the ‘layout’ of the community space to each student.
- Make sure that each table of students has crafting supplies (scissors, markers, colored pencils, tape, etc.)
- Prompt the students to begin creating: “Now that we’ve got some ideas in mind, let’s get crafting! You can use markers, colored pencils, construction paper – all materials are at your table. You can be as creative as you would like, but try to keep it realistic. Imagine you are creating the first draft design for this [insert public space name], and that a construction and design company could use your design as the layout for the re-imagined space. So, for example, if you are including a swingset, place that on your paper where you would want to see it in real life. Same goes for trees, plants, other parts of your design. We’ll have about 40 minutes for this”.
- While students are crafting, educator can walk around the room to check in on and engage with students. They can also provide time updates as the end of the 40 minutes nears, to let students know when to start wrapping up their designs.
- To close, prompt students to wrap up and put away their materials.
Group Sharing – 25 minutes
- After students have finished putting away their materials, use this time to have a group discussion, inviting students to share their designs with their peers.
- Facilitators can ask students to individually share out their designs: “can we have a few students share their design with the class, highlighting 1-2 things they included and why they chose to do so?”
- After a few students share, facilitators may then prompt the class:
- Was there anything you saw in your classmates’ designs that you also included?
- Anything you saw in your classmates’ designs that perhaps you did not include but really like the idea of?
- To end, facilitator can ask the group, adjusting these questions slightly based on the age level:
- how was this activity for you, how did it feel to design this space?
- was it hard to imagine new elements in the space, was it easy?
- what did you enjoy most about this? What did you learn?”
Closing – 5 minutes
- Facilitators can end the activity by:
- Recapping the elements discussed in the group share, summarizing similarities, differences, things liked and lessons learned.
- Ask students to share any final reflections on this activity before they close.
- Thank students for participating and reinforce the idea that designing and making art in this way can be a great way to think about themselves and their environments in new ways.
Primary & Additional Resources
Primary:
- Trust for Public Land’s “How to Create a Community Schoolyard” Toolkit: https://www.tpl.org/wp-content/uploads/2022/09/011922_Community-Schoolyards_P2.pdf
- Valley in Motion & TPL Community Schoolyards work in Scranton: https://www.valleyinmotion.org/community-school-yards
Additional:
- Romano, Arthur. Racial Justice and Nonviolence Education: Building the Beloved Community, One Block at a Time. Routledge, 2022. Ch. 2.
- Bell, Lee Anne. Storytelling for Social Justice: Connecting Narrative and the Arts in Antiracist Teaching. 2nd ed.,Routledge, 2019. Ch. 5.
- Michael Shank and Lisa Schirch. Strategic Arts-Based Peacebuilding. Peace & Change: A Journal of Peace Research Vol. 33, Issue 2, April 08. https://www.michaelshank.tv/wp-content/uploads/2014/10/Strategic_Arts_Based_Peacebuilding-2.pdf
